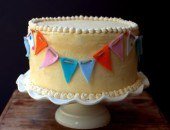
Salted Caramel Italian Meringue Buttercream

I’ve spoken in the past about the virtues of Italian meringue buttercream: silky, a dream for decorating, sweet but not overly so. Today, I give you salted caramel buttercream, which tastes every bit as decadent as it sounds.


I used salted caramel buttercream on a four-layer cake for my sister-in-law’s baby shower, and several friends said it was their favorite flavor yet. The layers were white velvet cake, my standard for non-chocolate layer cakes.


The shower featured a hot air balloon theme. My talented friend Katie made the cookies. Guests played a guess-the-name game, as my brother and sister-in-law are keeping my nephew’s name a secret until he’s born (a.k.a. torturing the grandmothers).


 Shower Photos by Jennifer Alsabrook-Turner
Baby boy is lucky to have such hip parents. My brother, Kent, is a professional counselor, former rock-n-roll drummer and cigar aficionado. And my sister-in-law, Carmen, is one of the most creative and stylish people I know.
 Photo by K. Photography
Carmen is a photographer by trade (her newborn photography will give you baby fever), so I decided Baby Boy needed this:


We can’t wait for his arrival.


Yield: 5-6 cups
SALTED CARAMEL ITALIAN MERINGUE BUTTERCREAM
This recipe makes 5-6 cups, which should be more than enough to fill and decorate a three- or four- layer cake or decorate two dozen cupcakes, depending on how heavy-handed you are with the buttercream. I used white velvet cake for the layers.
Ingredients:
For The Salted Caramel
1 cup sugar
1/4 cup water
2 tablespoons light corn syrup
3/4 cup heavy cream
4 tablespoons unsalted butter
1/2 teaspoon of sea salt (or more to taste)
For The Buttercream
1/2 cup water
2 1/4 cups sugar
1 teaspoon light corn syrup (to keep the sugar from crystallizing)
6 egg whites (pasteurized if you wish)
1 tablespoon vanilla extract
1 1/4 lbs (5 sticks) unsalted butter at room temperature
1/4 lb (1 stick) salted butter at room temperature
1 - 1 1/2 cups salted caramel
Directions:
Make The Caramel: In a medium saucepan, combine the sugar, water and corn syrup. Bring to a boil and cook over medium-high heat until a deep amber caramel forms, approximately 6-8 minutes. (If you notice the syrup edges turning browner than the center, tilt the saucepan and gently swirl the caramel around. Keep close watch because the caramel can burn quickly.) Remove the saucepan from the heat and carefully whisk in the cream, butter and salt. Let the caramel cool to room temperature. When the caramel has cooled, taste. Whisk in more salt if desired (1/4 teaspoon at a time). The caramel can be made up to two weeks in advance and stored in the refrigerator. Bring to room temperature before adding to the buttercream.
Make The Buttercream: Add the sugar and corn syrup to a small pot, then slowly poor water over top, making sure no sugar is above water level, stirring if necessary. Attach a candy thermometer to side of pot. Turn heat to medium-high. Bring sugar water to 240 degrees F.
While the sugar is heating, beat the eggs in the bowl of a mixer on medium speed until stiff peaks form. Slow the mixer down if they reach this point before the sugar reaches 240 F.
When the syrup is ready, remove from heat. With the mixer on high, slowly — VERY SLOWLY — pour the sugar into the bowl, close to the edge and away from the beater, to prevent it from splattering against the sides of the bowl, where it will immediately harden. When all of the syrup has been poured in, continue beating the mixture on high until the bowl is cool to touch. This takes approximately 10 minutes, give or take a few.
With the mixer on low-medium speed, add the butter in tablespoon-size pieces until it is fully incorporated. The buttercream may break apart before starting to thicken up. Just keep mixing. When all of the butter has been incorporated and the frosting is smooth and fluffy, slowly add a cup of caramel, pouring in a thin stream. Beat on medium for another minute. Taste. If you want a stronger caramel flavor, slowly pour in the rest of the caramel. Beat for another minute.
You can decorate your cake or cupcakes immediately with the buttercream or store it in the fridge or freezer for future use, in which case it will need to be brought to room temperature and possibly whipped again lightly before using. I usually make my buttercream the day I’m serving the cake. (I always make my layers a day or two before and freeze them until I’m ready to assemble the cake.) The buttercream can sit out at room temperature for a few hours covered in saran wrap as long as your kitchen isn’t too warm (in which case you may want to pop it in the fridge for a few minutes once an hour until you’re ready to use).
Adapted from my recipe for Basic Italian Meringue Buttercream and Food & Wine